Greenhouse in a Bottle
Supplies:
2-liter soda pop bottle, washed out
with dish soap and a little bleach,
and well-rinsed with water
Utility knife | 4 toilet paper tube
seed starters -
See http://www.kidsgardenclub.org/wfdata/frame133-1011/pressrel6.asp
Organic seed-starting medium | Seeds
Combine our toilet paper tube
seed-starting idea with this simple mini-greenhouse, and your seeds will think
they're growing up in the Taj Mahal!
Do this several weeks ahead of the last
possible frost in your part of the country; the seed packet should tell you how
far in advance of that frost date you should start your seeds indoors.
Simply make four half-size t.p. tube
seed-starting containers, and fill with moistened seed-starting medium and your
seeds. Water in slightly.
Then take a 2-liter plastic soda pop
bottle, with lid. Cut it with a utility knife about four inches from the
bottom.
Take the rounded bottom piece. Into it, place
the four "loaded" t.p. tubes. They should snuggle up against each other.
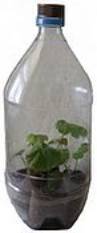
Then "screw" the longer top part down
into the rounded bottom piece.
Place in a warm spot that is out of
direct sunlight until you have germination. Then place the bottle on a
windowsill in fairly bright light - not too hot, though.
Watch your seedlings grow! It's that
simple!
If you keep the cap on, the humidity
should be as good as in a greenhouse in there. You should see fog and water
droplets on the sides. Of course, if you're concerned about too much moisture,
and the possibility of mold forming, especially if water runs down the sides of
the bottle, you can take your bottle greenhouse apart for a day or so to let it
vent.
When there's only about a week left
before the date of your area's last possible frost, set the bottle outside on
warm days for a few hours, starting on a porch, moving to the shade the next
day, then to partial sunshine, and finally into full sun. For the last few
days, remove the top of the bottle to let the plants get used to the out of
doors.
Then, when the frost date has passed,
your plants can move from their mini greenhouse into the soil outdoors!
Longtime gardeners re-use the soda bottle
tops as a "cloche" (cloashe) to protect seedlings from the wind - simply
"screwing" the top part down into the soil around a tender plant.
They also keep their two-part mini
greenhouses from year to year, to recycle and "rebuild" the greenhouses for
next year's crop!