Seed Tapes
½ C. white flour to make seed tapes for 6-8 children
Measuring cup | cold
water | craft stick or spoon for each child
You can spoon a little
flour mixture into a recycled plastic applesauce container
or small paper cup so
that each child has a supply
Single-ply toilet
paper | seeds of plants that grow best about 4" apart - daisies, marigolds,
bachelor's buttons, mini snapdragons, etc. | moist, prepared garden soil
Extra clean, dry
potting soil
Cardboard paper towel
or toilet paper roll for each gardener
Camera for "before"
and "after" pictures
Sprinkling can or
sprinkling attachment on a garden hose
Young gardeners sometimes have trouble planting small
seeds. They blow away; they drop out of your hand; you sneeze, and they go
every which way.
Kid-planted seeds sometimes grow up in a chaotic mess,
with 52 plants in one square foot, and 2 plants in the other 20 square feet. Of
course, that's an exaggeration.
But successful gardening has to be more efficient than
that. Crowded plants don't bear well, so there's a lot of waste if you have to
thin a lot of misplaced plants out, or extra work if you have to transplant
them where there is more space.
And
plants that are too far apart are just asking for trouble in the form of weeds.
So to help kids plant an organized and therefore happier
garden, you can make a seed tape. You don't really use tape, such as Scotch
tape or duct tape; you use thin toilet paper. It forms a guide for where the
children should place seeds, to keep them in an orderly pattern.
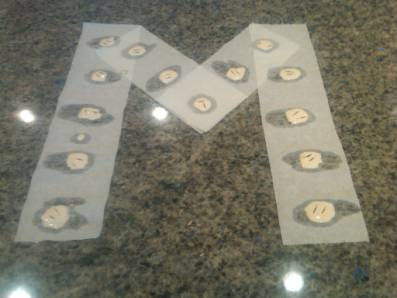
Two marigold seeds in each "blob" on a seed tape that forms
an "M."
Note: this is 'way too much paste for two seeds. Use just
enough paste to get the seeds to stick.
You
can work inside, in advance of planting day, out of the wind, and it really
helps kids with their seed spacing.
Do this on the floor if you don't have table space, in a
spot that you can leave the seed tapes overnight to dry.
Mix
the flour and water together, just enough to make a paste, with the consistency
of a thick glue.
Have the children unroll enough squares of single-ply
toilet paper to form the initial of their first name: "A" for "Andrew," for
example, could be formed with four squares for each side, and two squares for
the crossline.
Be
careful: the toilet paper is easily ripped.
Now each child can "paint" a small, thin blob of flour
paste in the middle of each square of toilet paper, using the craft stick. The
blob should neither be too thick nor too thin - about the size and width of a
dime.
When that's done, the child can sprinkle two or three
seeds into that blob of paste.
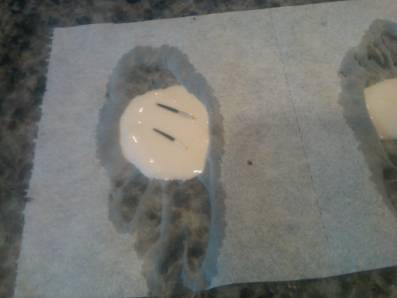
Caution: this blob of paste looks to be too large and thick;
even when dry, the toilet paper may tear when it is picked
up.
But: it worked, so oh, well!
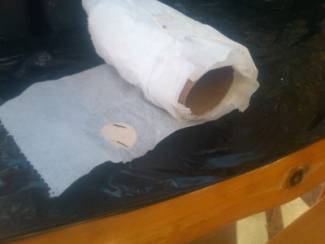
Let dry - preferably overnight. Next day, you may find
that you need a thin spatula to lift up each paste blob without tearing the
t.p.
Carefully
roll up the "seed tape" when dry, on an empty cardboard toilet paper or paper
towel tube for each gardener. Mark the gardener's name on the end of the tube.
These can store for weeks, or can be planted the next
day. It's up to you . . . and the spring weather in your area!
Write the child's name on the inside of the cardboard roll
to keep them straight at planting time.
You might also mark each planted seed-tape letter with the
child's name on a craft stick stuck in the soil, so they can
watch their
plants come up and form their initial letter.
At
planting time, make sure the soil is loosened up, raked, and free of clods,
rocks and twigs. It can be slightly moistened, but not wet. It's always a good
idea to toss some new compost onto a gardening plot and rake it in to mix with
the soil.
Each
child can lay out his or her initial letter. Make sure they aren't accidentally
spelling out a bad word! :>)
Be
sure to take a "before" picture of each seed tape at this point.
With
clean, dry potting soil rubbed between two hands, each child can cover the seed
tape with a fine dusting of dry soil - just enough so that the toilet paper can
no longer be seen.
Follow
up with a light sprinkling of water that is more like a spray than a downpour.
Over
the next few weeks, the toilet paper will decompose - that means break down -
and become part of the soil. But the seeds will sprout, given sun and rain or
watering, and grow in a pattern to form the child's initial letter.
If
two or three seeds come up together, once the plants are about 3-4" tall, the
children can use small scissors to snip away and discard all but one plant in
each grouping. They planted more than one seed in each toilet paper square in
case that one seed didn't germinate. But you don't want to overcrowd your
plants.
Once
the flowers have blossomed, take "after" pictures of each child's creation, and
share.
Well-organized:
that's just how you planned it, with the seed tape. In fact . . . you had it on
tape!